Part 1 (Optional)
Fill a non-latex balloon with helium (go to a local store if your school does not have a helium tank) and tie it to a string. Fill up another non-latex balloon with hydrogen gas. The balloon should be somewhat inflated of hydrogen, but not completely full. If you do not have a hydrogen gas tank at school, you can add 4–6M HCl to mossy zinc or aluminum soda can tabs in a flask. Place the balloon over the top of the flask to collect the hydrogen gas that is given off from the reaction. Be extremely careful with this balloon as the gas is very reactive. Tie this balloon to a string and place it next to the helium balloon. Tell students which balloon is helium and which balloon is hydrogen. Ask them which balloon is used for birthday parties.
Many students will say that helium balloons are used because helium floats in regular air. However, the hydrogen balloon floats as well. Ask students, “Why is hydrogen gas not used for birthday balloons?” Carefully attach a match to the end of a meter stick using tape. Light the match and gently bring it to the helium balloon. It will pop. Do the same thing with the hydrogen balloon. It will pop (loud sound) and produce a burst of flames (this is why the balloon should be smaller than the helium balloon). Tell students, “Hydrogen is very similar to helium based on their atomic numbers, but helium has two valence electrons, which is considered to be a full shell, making it a noble gas. Due to this electron configuration, helium is not very reactive. Hydrogen, however, has one valence electron, which is not a full shell. Hydrogen would need to gain an extra electron to be like helium or lose its electron to another atom. Hydrogen’s electron configuration, in part, is what leads to its reactivity. The very fast reaction that took place as the hydrogen balloon exploded was the sudden formation of water with hydrogen from the balloon and oxygen from the air.”
Part 2
In order for this lesson to be effective, students need to be able to determine the number of valence electrons in a given atom as well as determine the ion an atom forms as it transfers electrons. Ask students to review these concepts by completing the Valence Electrons and Ionic Review Worksheet (S-C-4-2_Valence Electrons and Ions Review and KEY.doc). Have students use their periodic tables to help them find the number of valence electrons in the elements. Go over the answers with the class and provide instruction on valence electrons and ion formation as necessary before proceeding with the lesson.
Part 3
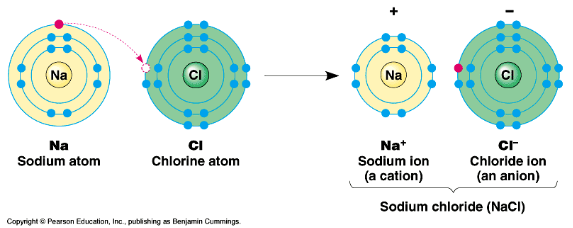
Say, “When an atom loses or gains electrons, where do those electrons go and why does that loss or gain happen? Let’s look at sodium (Na).” Draw the Lewis dot structure for sodium.

http://macro.lsu.edu/russo/Courses/1201WebS99/pictures/LewisCl.gif
Draw the reaction for the formation of NaCl on the board. Say to students, “The diagrams summarize the transfer of an electron from sodium to chlorine and the ions that are formed in the process. Sodium is has an electron to give and chloride needs an electron to fill its valence shell. In an ‘ionic bond,’ one or more electrons are transferred from one atom to another.”

“Let’s try another ionic bond.” Begin to draw the Lewis dot structures for both calcium and chlorine shown below as you talk to students. “Calcium has two valence electrons, whereas chlorine has seven. If calcium transferred both of its valence electrons to chlorine, chlorine would have an extra electron. However, if we had two chlorine atoms for every one calcium atom, one of calcium’s electrons would be transferred to each chlorine atom.” Draw arrows to show the transfer of electrons as you explain the formation of calcium chloride. Refer to the bottom diagram for a visual representation of this ionic bond formation. Have the students try diagramming the ionic bond that forms between magnesium and oxygen, including arrows to show the transfer of electrons. Review the answer with students.

Source: http://hyperphysics.phy-astr.gsu.edu/hbase/chemical/lewis.html#c1
“Notice that every ionic bond we have looked at involves atoms that form ‘cations,’ or positive ions, and ones that form ‘anions,’ or negative ions. Ionic bonds comprise positive and negative parts. Elements that form positive charges are called metals and elements that form negative charges are called nonmetals. Therefore, ionic bonds are made up of at least one metal and at least one nonmetal.”
Distribute copies of the Ionic Bonding Lewis Dot Structures worksheet (S-C-4-2_Ionic Bonding Lewis Dot Structures.doc). Have students work individually or in pairs to complete the worksheet.
Extension:
-
You may choose to discuss and the factors that lead to polarity. Atoms with similar electronegativities will form covalent bonds, either polar or nonpolar. Atoms with very different electronegativities will form ionic bonds, because the electrons are so delocalized.
-
An interesting discussion to have in terms of ionic bonding is the “loss” of an electron. For the purposes of introductory chemistry, many teachers find it easier to explain an ionic bond as the transfer of an electron from one atom to another. However, the electrons are not exactly transferred completely. A great example of this is lithium fluoride (LiF). The diameter of a neutral lithium ion is 2.52 Å. Lithium forms a positive ion as it “loses” one electron when combining with fluorine. However, students may be interested to learn that as lithium’s electron is transferred, it actually ends up closer to lithium than it was before. After the loss of lithium’s valence electron to fluorine, the distance from lithium’s nucleus and its “lost” electron is only 1.56Å!
-

-
Source: http://www.chem1.com/acad/webtext/chembond/cb04.html
-
-
Before or after you discuss ionic compounds, you may wish to teach or revisit naming ionic compounds. Flinn Scientific, provided by Science Spot, has a great naming activity based on a basketball tournament. The worksheet and answer key can be found at: http://www.nclark.net/ChemistryCompoundTournament.pdf
