- Activity 1, Day 1
Begin this lesson by placing students in pairs sitting on the ground facing one another. Note: Select two students to model how the pairs are to be seated. Ask students to face each other and place their hands chest high with palms facing their partner. Each student places his/her palms on the other’s and at your signal, begins pushing. Allow students to push for about 30 seconds. Ask the following questions: “What did you feel when your partner pushed against your hand?” (pushing on my hands) “What did you do?” (I had to push back.) “What would happen if you did nothing?” (I would be pushed back or pushed down.) Now ask students to hold each others hand and pull. Allow students to pull for about 30 seconds. Ask the following questions: “What did you feel when your partner pulled against your hand?” (pulling on my hands) “What did you do?” (I had to pull back.) “What would happen if you did nothing?” (I would be pulled forward.)
Write the word force on the board or chart. Ask students if they can define this word. Allow students to develop a working definition of force as a push or a pull. Add to this definition: “which can cause an object to speed up, slow down, or change direction.”
Ask students if there was a force used when they placed their hands on their partners. (Yes, we pushed and pulled.) Tell students they were applying or using force. Draw two arrows on a chart or board. Ask students: “If I wanted to show a force such as a push or a pull, how could I use the arrows to do that?” Students should conclude that the arrows could be used to show the direction of the force that is being applied.
Distribute copies of the Hunting for a Force worksheet (S-K2-15-1_Hunting for a Force.doc). Tell students they will be taking a field investigation around the school and outside to locate examples of a push or pull force. They are to identify the example and circle the arrow that indicated the direction of the force being applied. Note: Preview the area you will be taking students so that examples can be found easily for them. Areas may be marked if students need practice identifying objects.
Give students copies of The Force worksheet (S-K2-15-1_The Force.doc) and have them complete it.
Activity 2, Day 2
Review with students the term force and how we identify a force that is applied to an object.
Tell students they will investigate the change that occurs when a force, such as a push or a pull, is applied to an object. Give a few examples such as pushing someone on a swing or pushing a shopping cart. Be sure to go over safety procedures with students and remind students that goggles should be worn at all times during this investigation.
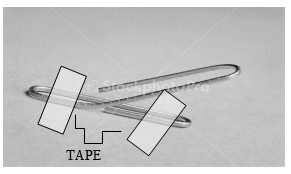
Hand out copies of the Cotton Ball Launcher worksheet (S-K2-15-1_Cotton Ball Launcher.doc). Divide students into groups of four. Give each group two large paper clips and two small paper clips. Note: You may prepare the paper clips if you feel students will not be able to do this independently. Prepare each clip to become a launcher by pulling the inside of the clip out to form a “V” shape. Place the large part of one clip down and tape it to the table so that the small loop is up.
Take the other large clip and tape the small loop to the table or floor so that the large loop is up.
Tell students they are to determine who will launch the larger clips and the smaller clips. Students who are not launching will measure and record the data on the investigation sheet. Tell students to place the cotton ball on the “launcher” part of each large paper clip. Pull or push the launcher clip down and release. Launch the cotton ball, measure, and record the distance. Repeat the launch three times and record measurements. Note: Model how the cotton ball should be launched and measured for students.

Note: Two paper clips will be taped to the table. One will be taped by the larger section and the other by the smaller section.
Repeat this investigation with the two smaller clips.
Collect the data from other group members and make two charts displaying the data. Discuss results with students. Have students draw conclusions about their results.
Extension:
For students who may be going beyond the standards:
-
Have students design their own launchers. Then they launch cotton balls, or other material record measurements, and compare data with other students.
-
Create a bar graph to display the results.
- For students who might need opportunities for additional learning:
